How To Make Pickles – Tips For Making The Best Fermented Pickles At Home
Crispy, sour, and delicious, pickles can make any meal better. And if they are very good, they make perfect and healthy snacks too. Did you know you can make pickles at home in less than 30 minutes? Yes, it is possible and quite easy, honestly. The best fermented pickles are exactly how you want them to be – spicy or sweet, dill pickles or garlicky pickles, super crispy or tender. The process we use for pickles is fermentation, which allows us to make perfect pickles every time. If you want to learn how to make pickles like a pro, we have all the tips and tricks.
You can make your own batch of pickles if you follow the steps we detailed below. There are many recipes you can follow but, if you know the basics, you can create your own recipe without throwing away batches that don’t satisfy your taste. We also decided to talk about the different methods of making pickles because we know it can be a bit confusing. We love fermenting because this ancient method is simple and easy. We know canning is very popular these days but it requires more time and more effort than fermenting. You’ll see what we’re talking about in just a bit.
Fermenting 101
Fermenting is a preservation method that has been used for centuries. However, if we’re being honest here, the reason we’re making pickles today is that we love the taste and flavor of pickled vegetables. So we’re not really doing it to extend the shelf life of veggies but to have delicious pickles at our dinner table or in your sandwiches and salads.
Now, the taste can differ depending on the method you use for pickling. The process can also be different. You can immerse the veggies in a salt and water brine or use vinegar. If you use vinegar, the process is faster but, since not everybody is a fan of the vinegar pickled veggies, saltwater brine is a better option for most.
Many people opt for purchasing pickles because pickling sounds like an intimidating process but there’s nothing to worry about, pickling is actually extremely easy. Here are the basic steps you need to follow:
1. Pick Your Produce
The secret of good pickles is in the produce you choose. If the vegetables you choose are good so will be the pickles. That’s why it’s important to look for ripe and fresh fruits and vegetables with no blemishes. It’s best to pickle the veggies the same day you buy them so they can be as fresh as possible.
2. Prep The Veggies
Make sure you wash the veggies thoroughly. Also, it’s very important to trim the stems. This will prevent the veggies from turning mushy. If you don’t trim the stems, the brine interacts with the enzymes in the stems, resulting in mushy pickles.
3. Prep The Saltwater Brine
If you opt for vinegar, you can skip this step. If not, you have to prep the brine. Some pickles are better made with sea salt, others with kosher, and others with table salt. Don’t substitute the salt in the recipe with salt you have in your pantry because you won’t like the result. If you want to make sweet pickles, the brine also requires some sugar.
4. Add Herbs And Aromatics
This is not a mandatory step. You can ferment veggies just with vinegar or a salted brine. However, if you like a little bit of flavor in your pickles, you can add garlic, spices, and herbs to the liquid. This will intensify the flavors of your beloved pickles. The most common addition is dill weed but you can also make your pickles spicy by adding pepper flakes. Or you can make them a little garlicky by adding garlic. Choose the spices and herbs that work for you.
5. Put It All Together
All it’s left to do is to put everything together and let nature do its magic. Place the veggies in the jar or container of choice, pour the brine over the veggies, making sure they are fully submerged in the liquid, and cover the jar.
If you want to preserve your pickles for the long haul, canning is best. However, if you only want to make a small batch of pickles to last you a few weeks max, use our Easy Fermented Lids for fermenting. With these special lids, you don’t have to worry about mold or any bad bacteria that can interfere with your veggies during the fermenting process.
What Kind Of Veggies And Fruits Can I Pickle?
It seems that pickles are synonymous with pickled cucumbers but that’s not the case. You can pickle pretty much any veggies or fruit. Pickled cucumbers may be your all-time favorite pickles but we think it’s time to give other veggies a try. Here are some other options for you:
- Asparagus
- Corn
- Onions
- Garlic
- Brussels sprouts
- Peppers (bell peppers, jalapenos, green peppers)
- Carrots
- Cabbage (any kimchi or sauerkraut fan here?)
- Radishes
- Watermelon rind
- Cauliflower
Fermenting Vs. Canning
Aside from the wonderful taste, fermented pickles are a great source of probiotics. Fermenting veggies is an easy way to ensure that you can easily incorporate more probiotics into your diet.
Most of us are used to canned foods, especially since all the pickles available in grocery stores are canned. But fermentation is an old preservation method and it was used back in the day to preserve food for winter. It’s also a method that requires less work than canning. Both methods can give you delicious pickles so let’s analyze the two methods and see how fermentation differs from canning.
The Process Of Canning Vs. Fermenting
We already listed the steps required for fermentation so we’re not going to do that again. Instead, we will talk to you about the processing differences between these methods.
For canning, you have to boil the jar of veggies in order to kill some bacteria and to seal the jar. Sealing is necessary because you want to prevent the oxygen from entering the jar and causing the veggies to spoil. When this process is done correctly, the pickles are shelf-stable for a very long period of time. We’re talking years here.
Fermentation also prevents oxygen exposure but, instead of using a seal to keep the oxygen away, you’re going to use a brine. Salt is added to the brine to eliminate bacteria that cause spoilage. However, with fermentation, you want good bacteria to grow, absorb the sugar in the veggies, and create lactic acid. Lactic acid alters the taste of the veggies and also prolongs shelf life.
Long story short, canning kills all bacteria or micro-organisms while fermenting only kills the bad bacteria.
Time Comparison
Canning requires more work to produce a batch of pickles and, if you do not plan to make a large batch to have pickles for the entire winter, it’s not worth the struggle. You have to prep the veggies, sterilize the jars, boil the jars in the water bath, cool them, and then store them.
With fermenting, the job is done in less than half the time required for canning. All you have to do is to prep your veggies, prep the brine, place everything into a jar, and use a proper airlock system like our Easy Fermenting Lids. In a few days or a few weeks, your pickles will be ready to enjoy. The best thing about this method is that it gives you room to make some mistakes because you can taste the veggies during the fermentation process.
Tools Comparison
These preservation methods require different tools. For both methods, you need jars or some type of container. To make canned pickles, you need a canning kit, a water bath canner, and jar lids. You can re-use the jars but you need new lids every time. For fermenting you just need jars, lids (both can be reused), and the Easy Fermenting Lids to keep mold away during the process.
Storage Comparison
If you do everything right, canned pickles can last for years on end in your pantry. However, it’s important to maintain the room temperature below 70 degrees F. The ideal storage conditions for canned pickles are a dry and cool environment with steady temperatures (50-70 degrees F).
Fermented food must be kept in the fridge once the fermentation process is over because you want to stop the fermentation once the pickles reached your desired taste and texture. Fermented foods don’t last as long as canned foods but they still last for months on end. This method is definitely better for small batches and for those who don’t want to risk any food born disease that can occur if the canning process is not done properly.
Nutrition Comparison
Canning decreases the nutritional value of fresh produce during heating. Also, canned veggies and fruits lose nutritional value over time so, even though the pickles can last for years, they are not as nutritional as they were at the beginning.
With fermentation, the nutritional value actually increases because, during this natural process, the good bacteria produce additional vitamins and enzymes that are not typically present in the fresh state of the produce. These enzymes are actually probiotics that facilitate digestion and help the gut to function optimally.
Tips For Making Crispy Pickles
No one likes mushy pickles. Pickles need that crispy, perfect texture, right? We agree and trust us when we say that the perfect texture is not hard to obtain. In the following paragraphs, we have the best tips for how to make pickles crispy and firm:
Use fresh produce
We cannot stress this enough – if you want good pickles, you need good veggies. Make sure the veggies you plan to pickle are fresh and firm. That’s really a must. If you cannot pickle the veggies the day you purchase them, pickle them as soon as possible and make sure you only use the veggies that are still looking as fresh as the day you bought them.
Trim the ends
This is particularly important for cucumbers but you can do it for all veggies. The stems of cucumbers contain an enzyme that alters the texture of the cucumbers when interacting with the salted brine or vinegar. If you don’t want limp pickles, you want the ends removed from the cucumbers.
Don’t chop too much
The more you chop, the mushy the veggies. You probably noticed that thinly sliced cucumbers you purchase at the grocery store are always less crispy than whole pickles. If you like your pickles crispy, keep the chopping and slicing for later and pickle the veggies whole.
Watch your processing time
We’re big fans of fermenting because the process is easier and you can stop it whenever you feel the veggies reached your desired taste and texture. With canning, you have less control because your canned veggies need to spend some time in hot water to ensure a good seal and kill some bacteria. But, during the process, the veggies get cooked a little bit, which can alter the texture, making them less crispy.
Fermenting allows you to check on your pickles daily so it’s definitely the best option for a pickle newbie.
Make refrigerator pickles
For fermenting, you have to let the pickles sit in their jar at room temperature for a few days or weeks. For canning, you have to use hot water. Opt for fermenting not canning if you don’t want to risk cooking the pickles too much and ending up with batches of pickles that are not as good as they can be.
If you live in a place with high temperatures year-round you can ferment your pickles less than the required time or you can make refrigerator pickles. They won’t be shelf-stable but they will have the texture you want and they will keep in the fridge.
Make Probiotic Rich Pickles in 10 Easy Steps:
Step 1: Here’s what you’ll need.
Before you begin making pickles, make sure you have everything you need to get started.
Here are all the fermenting tools and ingredients you'll need.
What you need:
- 1-2 lb pickling cucumbers
- Fresh garlic (optional)
- Fresh or dried dill weed
- 5 Tablespoons salt per 2 quarts of non chlorinated water
- A mason jar
- An Easy Fermenter Lid that allows you to put the fermentation process on auto-pilot
- Weight(optional)
Step 2: Selecting your cucumbers
What are you looking for in your selection?
- Fresh and Firm (Fruit that is already breaking down will not make a good ferment)
- Thick rather than thin
- Similar size if making spears
- Kirby cucumbers work best
- Organic if possible
Step 3: Preparing your cucumbers
After you wash them, it’s time to cut up those cucumbers. If making spears, then cut the cucumber in half and then along the length to get slices of approximately the same length and thickness, so that they will ferment evenly.
Step 4: Chopping dill and mincing garlic
If using fresh dill, wash it and chop it up with a knife of kitchen scissors. You can also use dried dill, but it is not recommended as the fresh is far superior in flavor. Mince or chop garlic if you prefer.
Step 5: Mixing Ingredients
Mix your dill, garlic and cucumbers in a bowl and then place the mixture into your mason jar.
Step 6: Preparing your brine
Dissolve salt into water.
Step 7: Submerging the cucumbers in the brine
Add the brine to the jar, leaving a little room between the brine and the top. Make sure that the cucumbers are fully submerged. A weight is the easiest way to do this, but if you are not using a weight, there are other options. A small plate, a boiled rock or even a piece of cabbage can all be used to help keep your veggies submerged.
Step 8: Sealing with the proper lid
Screw on the Easy Fermenter lid and use the lid’s air removal feature to pull the extra air out, creating the anaerobic environment that probiotics thrive on. Put today’s date on the jar.
Step 9: Being patient
Place the jar in a cool place, approximately 70 F /21 C. Wait 4-5 days to check them. If they smell okay(not like bad bacteria), then taste test, but don’t double dip or put your fingers into the batch as this will contaminate it. If you want a stronger taste, you can reseal the jar, vacuum the air out again and wait up to another 7 days. But test every 2 so you don’t over do it.
Step 10: Moving to storage
When you have the preferred taste, exchange your Easy Fermenter lid for a regular one and refrigerate. Then it’s time to start your next batch.
The Visual Guide


Want To Take Your Fermenting To the Next Level?
Enroll in our Fermenting Mastery Video Series. A complete set of detailed, step-by-step instructions that will give you the confidence to create ferments that you’re proud of, every single time. Even when you make up your own recipes and techniques! Included are 14 professionally recorded recipes - Over two hours of content to help you master your ferments.
Related Content

Raw Pickled Fermented Ginger Carrots
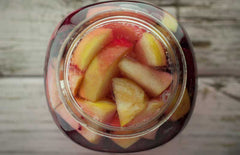
Delicious Easy to Follow Fermented Cinnamon Apples Recipe

How To Make Small Batch Wines And Meads
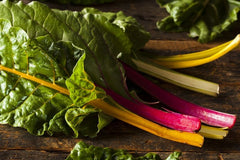
How To Make Fermented Swiss Chard Stems
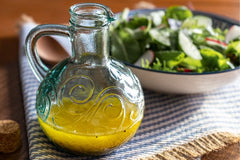
How To Make Apple Cider Vinegar Dressing